Tuesday, August 24, 2010

Leftovers: Rice Edition

Whereas Matt is happy to reheat leftovers for days on end – either for lunch at work or for dinner at home – I tend to be turned off by them the very next day, with two notable exceptions: Italian food and Asian food.   I can reheat and enjoy pasta, lasagna, lo mein, and pad thai for days on end, though I’m guessing this has more to do with my love of carbs than with an appreciation for any cuisine in particular.

If you’re like Matt and don’t mind reheating and eating leftovers in their original form, try dribbling about a teaspoon of water over them before sticking them in the microwave.  Microwaves work by heating the water within the food, so adding a bit of moisture beforehand will reconstitute the food and help it heat all the way through.  I generally heat leftovers for 2:30 or 3:00 minutes on high, but I like for my hot food to be really, really hot.   In fact, I spend most weekends waiting for Matt to get up so that I can say, “Oh hey, while you’re up, would you mind reheating my coffee?”  My mother is the same way.  Genetics are very odd.

Ask yourself as well if the food would benefit from being reheated by methods other than microwaving.  Fried rice, for example, is delicious when reheated in a frying pan, and pizza stays crispy when reheated under the broiler or in a toaster oven.  Be creative with your heating methods, and you might be pleasantly surprised by the results.

When utilizing frozen leftovers like soup or pasta sauce, try running the container under the faucet for a bit to loosen the contents inside, as defrosting in the microwave can be a bit harsh and might alter the flavor.  Once the contents have withdrawn from the sides of the container, dump them into a pot and bring them to temperature over medium-low heat, stirring frequently and leaving the top on in between.  Make sure to bring the food to a boil to eliminate any harmful bacteria.

All this being said, sometimes, no matter how tasty I found the first iteration to be, I just don’t want to eat the plain old leftovers the next day.  Or, alternatively, the leftovers don’t comprise a meal on their own, as is the case with rice.

Here are two recipes I enjoyed, both of which utilize leftover rice.  In a time when everyone is trying to save money, every grain counts!

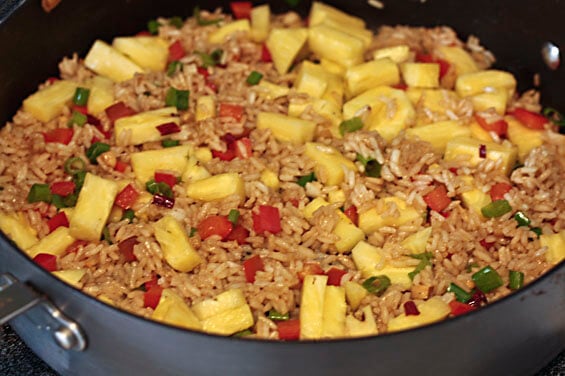
PINEAPPLE CASHEW FRIED RICE (adapted from gimme some oven)
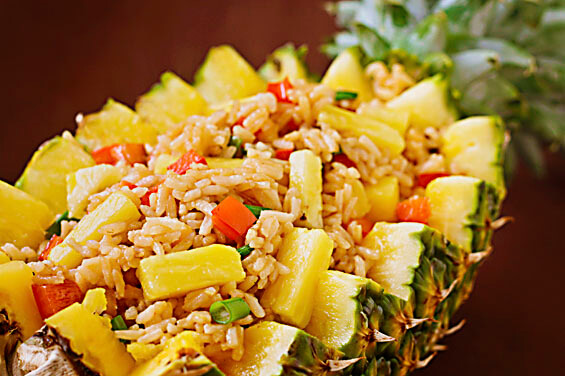
(photo from gimme some oven)

2 cups leftover rice (I used Goya Curry Rice – my favorite! - which I believe I'd made for an Old El Paso Fajita Dinner Kit meal)
1 tbs vegetable oil or wok oil
2 – 3 scallions, diced, saving the green parts for garnish)
2 tbs minced ginger (I freeze mine and thaw under running water, then microplane)
1 red bell pepper, diced
1 hot pepper, minced (I freeze jalapenos and thaw under running water, like the ginger)
1 cup fresh pineapple, diced (I bought the peeled, cored kind at the supermarket because it cost the same as a whole, unprepared one!)
¼ cup cashews
1 tbs soy sauce (I always try to use low sodium)
1 tbs fish sauce or oyster sauce
1 tsp sesame oil
salt and pepper to taste

Warm the oil in a wok or large skillet over medium-high heat (wok oil is an easy way to add an Asian essence to your food - most contain hints of garlic, ginger, and some combination of spices and heat).  Add the scallion whites, ginger, bell pepper, and hot pepper / chile.  Saute until fragrant, 1 – 2 minutes.

Add the rice, stirring frequently, for 3 – 5 minutes.  Add the pineapple, cashews (I can't remember if I used raw or roasted, but definitely don't use the seasoned snack kind), soy sauce, and fish sauce, and stir until well coated and heated through, about 2 – 3 minutes.

Season to taste, and add the green scallion parts as garnish.


CHEESY VEGETARIAN BURRITOS (original recipe)

1 tbs canola or other neutral vegetable oil
½ red onion, minced
1 clove garlic, minced
1 – 2 chiles (I used the mild Thai chiles from my garden, so I added three and kept the ribs and seeds)
1 tbs cumin
1 tsp chipotle chile powder
1 tsp dried oregano
1 15 oz can black beans, rinsed
1 – 2 cups leftover cheesy vegetable rice (see stuffed zucchini recipe)
1 – 2 tbs minced cilantro (I used parsley since my cilantro plant died)
the juice of half a lime
salt and pepper to taste

4 whole wheat tortillas
reduced fat sour cream
salsa
Tabasco sauce

Heat the oil in a nonstick skillet over medium low heat.  Add the onion, garlic, and chiles, and soften for 2 – 3 minutes.  Add the cumin, chipotle powder, and oregano, and stir to coat.  Add the black beans and leftover rice and stir to combine.  Heat through, stirring occasionally, for 4 – 5 minutes.  Squeeze in the lime and stir in the cilantro or parsley.  Season to taste.

Meanwhile, heat the tortillas in the microwave for 30 seconds.  Flip and heat for another 15 seconds.  Lay them flat, spread with a tablespoon or so of sour cream and salsa, add about ½ cup of filling, and roll, tucking in the sides as you go.  If you like your burritos hot, add a few dashes of Tabasco to the filling before rolling.

I hope that these recipes help you breathe some new life into your leftovers.  Be flexible (neither of these recipes called for the types of rice I used), and use your imagination.  In my experience, you won’t be disappointed, if only for the knowledge that you’ve saved so much money and left nothing to waste, something I think we should all try to do more often.

- M

Saturday, August 21, 2010

Zucchini, Circa 1950

I tried a really retro recipe today.  It actually didn't strike me just how retro it was until I started trying to think of a title for this entry.

I had two Boston Organics zucchini stragglers in my refrigerator that I was trying to decide what to do with.  I considered some sort of fritter, but I haven't been feeling very well recently, so I wanted to avoid ingesting much oil or egg.  I then remembered a recipe I came across on Tastespotting recently for Stuffed Zucchini with Vegetable Rice and Cheese.  The blog "Zoom Yummy" touted it as "light, healthy, playful, and favorful," and most importantly, "simple."

I mistakenly cooked 1 cup of rice (instead of 1/2 cup) in 1 3/4 cup of broth, so the end result seemed a bit dry.  However, I used half the amount of cheese and just as many vegetables, and those proportions all seemed right - I now just have an extra cup of cooked cheesy rice with which to play around tomorrow (I plan on adding some canned beans and/or rice, reheating, and stuffing into a makeshift veggie burrito).  Pending the success of said burrito, I'm thinking of dedicating a post to the possibilities of leftover rice.  I used leftover rice a while back to make pineapple fried rice with cashews, and that turned out pretty well, so stay tuned ...

ZUCCHINI STUFFED WITH CHEESY VEGETABLE RICE (adapted from Zoom Yummy)
(original photo)

2 zucchini, washed, dried and halved lengthwise
2 tbs olive oil
1 large or 2 small carrot(s), peeled and diced
1 yellow/white onion, diced
1 clove garlic, minced
1/2 cup frozen peas
A few dashes of Worcestershire sauce
1/2 cup white rice (I used - and suggest - Carolina)
1 3/4 cup low sodium chicken or vegetable broth
1/2 cup shredded cheese (I used a pizza blend with mozzarella and provolone - any mild, melty cheese will do)
1 tbs or so raw sunflower or pumpkin seeds (optional)
salt and pepper to taste

Preheat your oven to 350 degrees.

Add the broth to a saucepan and bring to a boil.  Add the rice and lower to a simmer, covering and cooking until all of the liquid is absorbed (usually around 20 minutes - start checking at 15).

Meanwhile, hold the halved zucchini in your hand, skin side down, and gently scrape the insides out with a spoon.  Collect all of the insides, place into a double-folded paper towel, and squeeze out all of the moisture into your sink or garbage.  Mince.

Cover a baking sheet in aluminum foil.  Lay the zucchini halves, skin side down, on the aluminum foil, drizzle over a bit of olive oil, and distribute evenly with a brush.  Place into the preheated oven for about 10 minutes.

Heat a nonstick skillet over medium-low heat.  Add the onion, garlic, and squeezed and minced zucchini innards.  Soften for 2 - 3 minutes.  Add the carrot and peas (you can use a frozen veggie mix here if you'd like - peas, carrots, and corn).  Season lightly with salt and pepper.  Soften for 2 - 3 more minutes.  When the vegetables are soft and fragrant, add a few dashes of Worcestershire sauce, stir to incorporate, and turn off the heat.

By this time, the zucchini, vegetable mixture, and rice should all be ready.  Remove the zucchini from the oven.  Add the vegetable mixture to the rice, add most of the 1/2 cup of cheese, and stir.

Being careful not to burn yourself, pack the rice mixture into each hollow zucchini half.  Sprinkle the remaining cheese over each and then sprinkle over a few sunflower or pumpkin seeds.  Return to the oven for about 20 minutes.  Once the cheese is melted and almost crispy, remove and allow to cool for a minute or two before serving.

Serves 4.  Nutritional info per half zucchini: 159 calories, 7 g fat, 1.6 g saturated fat, 0.5 g polyunsaturated fat, 2.5 g monounsaturated fat, 5 g cholesterol, 374 mg sodium, 312 g potassium, 22 g carbs, 2 g dietary fiber, 4.8 g sugar, 6 g protein, 29% daily vitamin A, 37% daily vitamin C, 8.5% daily calcium, 9% daily iron**

[** I do these calculations by hand using internet sources - if you are on a strict diet for any reason, please do not rely solely on these figures!  I am NOT a nutritionist!]

I'm by no means a mother, but this seems like a good way to serve vegetables to your kids.  Otherwise, it's a nice throwback, and a surprisingly healthy comfort food.  Enjoy.

- M

Thursday, August 19, 2010

Chili, Chili, Chili!

I have made a LOT of chili over the past couple of years.

Turkey chili, beef chili, bean chili, butternut squash chili - you name it, I've made it - and as it turns out, many food bloggers use chili as a means of serving up those confounding local greens like chard, kale, collards, beet, dandelion, mustard, and turnip (check out Types of Cooking Greens by About.com: Local Foods for a helpful overview).  I have yet to make a chili I didn't like; plus, the leftovers keep for a while (and freeze well, too).

There's also something to be said for a dish that tastes better the longer you cook it.  There's no fretting about burning, toughening, or drying out - if too much liquid evaporates, just add more!  This makes for a relaxing - and ultimately rewarding - cooking experience.

[Disclaimer: I couldn't care less about the great chili debate and thus have no desire to take part in it.  Is it a stew that involves meat, beans, tomatoes, and/or veggies, and is infused with southwestern/Latin American flavors?  Good.  Then I'll call it chili and I'll like it.]

That being said, any chili (no matter what your definition) can be greatly enhanced by a variety of accoutrement.  I prefer shredded cheese to sour cream, as the cream eventually breaks and turns the chili an unappetizing shade of pale pink.  Avocado, cilantro, scallions, and chives are always welcome.  I also like to whip up a batch of cheddar jalapeno corn muffins which requires only five ingredients - cheddar and jalapeno (shocking), "JIFFY" corn muffin mix, one egg, and milk.  They take 20 minutes from start to finish and are absolutely divine.

Read on for two chili recipes (plus the cheddar jalapeno corn muffins) that have done me well.  The next time you open your Boston Organics box and are greeted by a few giant bunches of intimidating greens, consider turning to chili for a satisfying fix.

BLACK BEAN CHILI WITH BUTTERNUT SQUASH AND CHARD (adapted from running with tweezers)

2 tbs olive oil
1 large or 2 small yellow onion(s), chopped
3 garlic cloves, chopped
1 medium jalapeno, diced into small pieces (omit the ribs and seeds if you're "spice sensitive")
2 1/2 cups peeled and diced (about 1/2") butternut squash
3 tbs chili powder
3 tsp ground cumin
1 tsp cayenne pepper
1 tsp dried red chili flakes
1/4 tsp salt (plus more at the end if necessary)
2 15 oz cans of black beans, rinsed and drained
1 15 oz can of garbanzo beans/chickpeas, rinsed and drained
2 1/2 cups of vegetable broth
1 15 oz can of diced tomatoes in juice
1 bunch of coarsely chopped greens (chard, kale, etc.)

Heat the oil in a large, heavy-bottomed pot over medium heat.  Add the onions and garlic and saute until tender and golden, about 5 minutes (be careful not to burn the garlic!).  Add the jalapeno and squash, plus the cayenne pepper, chili powder, cumin, and salt.  Stir for a couple of minutes until the vegetables are fully coated and the spices are aromatic.

Stir in the beans, broth, and tomatoes with juices and bring to boil.  Reduce the heat and simmer, uncovered, until the squash is knife-tender (about 15 minutes).  Stir in the greens and simmer until tender but still bright green (about 4 minutes).  Season to taste with salt and pepper.  Ladle into bowls and serve.

Serves 6 - 8.  Nutritional info per 1 1/2 cup serving (without garnish): 273 calories, 6 g fat, 962 mg sodium, 244 mg potassium, 46 g carbs, 10 g fiber, 5 g sugar, 14 g protein, 154% daily vitamin A, 52% daily vitamin C, 16% daily calcium, 22% daily iron**

BEEF CHILI WITH BEET GREENS AND CORN (adapted from Just Making Noise)
(original photo)

1 lb ground beef (I used 85% lean)
2 tbs olive oil
2 small white onions, diced
3 garlic cloves, peeled and minced
1-2 small chiles (I used 3 Thai chiles from my garden as they're not very hot), diced (omit the ribs and seeds if you're "spice sensitive")
1 tbs dried oregano
1 tbs dried basil
1/2 tbs ground cumin
1/2 tsp dried chili flakes (omit if you're worried about heat)
1/4 tsp salt
1 15 oz can crushed tomatoes in juice
2 cups beef stock
2 15 oz cans black beans, drained and rinsed
1 15 oz can corn kernels, drained and rinsed
1 bunch greens (I used beet)

Heat the oil in a large, heavy-bottomed pot over medium heat.  Add the onions, garlic, and chiles and saute until tender and fragrant, about 3 - 4 minutes.  Add the oregano, basil, cumin, chili flakes (optional), and salt, and stir to coat.  Add the crushed tomatoes and beef stock, and stir.  Reduce the heat and simmer, covered, for about an hour.

Add the black beans and corn and stir to combine.  Heat through (about 5 - 10 minutes).  Add the greens and cover for up to 5 minutes to wilt.  Season with salt and pepper to taste (if necessary), and serve with any garnish you'd like (cilantro, avocado, cheese, etc.).

Serves 6 - 8.  Nutritional info per 1 1/2 cup serving (without garnish): 383 calories, 17 g fat, 5.2 g sat fat, 51.3 g cholesterol, 976 mg sodium, 495 mg potassium, 33 g carbs, 7 g fiber, 7 g sugar, 25.5 g protein, 21% daily vitamin A, 48% daily vitamin C, 14% daily calcium, 25% daily iron**

"JIFFY" JALAPENO AND CHEDDAR CORN MUFFINS (adapted from "JIFFY" Corn Muffin Mix)
(photo from jiffymix.com)

1 box "JIFFY" mix (corn muffin variety)
Nonfat cooking spray
1 egg
1/3 cup 2% milk
1/2 cup shredded lite Mexican blend cheese
1 jalapeno, minced (omit the ribs and seeds if you're "spice sensitive")

Preheat the oven to 400 degrees.  Pour the dry "JIFFY" mix into a large bowl.  Add the milk and egg and stir with a fork to combine.  Add the jalapeno and cheese and mix again.

Spray a muffin tin with nonfat cooking spray.  Fill 6 of the cups half way with the mixture (if the muffin tin is "mini," the mixture will fill more than 6 spaces).  Bake for 15 - 20 minutes, depending on the power of your oven.  Allow to cool slightly and dislodge each muffin with a fork.

Serves 6.  Nutritional info per 1 muffin: 196 calories, 43 g fat, 46 g cholesterol, 414 mg sodium, 36 mg potassium, 28 g carbs, 1 g fiber, 8 g sugar, 7 g protein, 4% daily vitamin A, 2% daily vitamin C, 16% daily calcium, 5% daily iron**

[** I do these calculations by hand using internet sources - if you are on a strict diet for any reason, please do not rely solely on these figures!  I am NOT a nutritionist!]

Qué sabrosa.
- M

Tuesday, August 17, 2010

The Art of the Side Salad

I love being asked to bring food to a social gathering.  It's super satisfying to watch and listen to everyone devouring something you created with your own hands.  Therefore, when Miriam asked me to bring "something from [my] blog" to her potluck going away BBQ, I happily obliged.  I had collard greens and local corn from Boston Organics in my refrigerator that I wanted to use while they were still fresh, so all I had to do was find a recipe or two that fit.

One of my favorite activities (seriously) is searching Tastespotting for recipes featuring a specific ingredient.  When I do these searches, I copy and paste the name of the recipe, the main ingredients, and the URL into an email which I then send to myself.  I label the email "Food" and archive it so that it's searchable later.  Because I have so many of these emails now, I always search my Gmail account first for a specific ingredient before moving onto Tastespotting.  If I'm at home, I'll sometimes search my OCD-ified recipe clippings, but it's generally quicker and easier to search by keyword on the web.

The recipes I settled on were a Quinoa Taco Salad from the Gluten-Free Goddess and a Collard Greens Slaw from A Chow Life.  I had all of the ingredients on hand, save avocados and cilantro for the quinoa salad (my cilantro unfortunately perished during a week-long vacation earlier this summer - one of only two garden deaths thus far!).  Sounds easy enough, right?  Yah.  I had to go to three stores to find cilantro.  THREE.  Trader Joe's didn't have any and Whole Foods had run out.  I finally found some at Shaw's, by which point I was incredibly frantic as there was no way I was going to get to Miriam's on time.  Then ... wait for it ... when I got home, it turned out what I'd been picturing as quinoa in my cabinet was actually couscous.  Yep - I had to go back to the grocery store.  And finally, when I was already elbow-deep in the collard slaw, I realized I'd run out of golden raisins when making my last kugel.  Already about an hour behind and frustrated to the max, I decided that dried cherries would be a sufficient substitute.

The cilantro quest was worth it, despite the anxiety it produced.  I managed to make the two salads, shower, pack for my trip to Tanglewood to see Matt, and get to Miriam's in time for them to fire up the grill.  Both salads were a hit.


(photo from Gluten-Free Goddess)

1 cup quinoa
1 tbs extra virgin olive oil
Juice from two limes
1/2 cup fresh chopped cilantro
1 half small red onion, diced fine
1 bell pepper (any color - I had green on hand), cored, seeded, and diced fine
1 cup roasted corn**
1 large or 2 small avocado(s), cut in half lengthwise, pitted, scooped from skin, and diced
1 tsp salt
Pepper to taste

**There are three varieties of corn one could use in this recipe: canned, frozen, or fresh.  As I had corn on the cob, I needed to cook it (whereas canned would only need to be rinsed and added cold).  Borrowing from instructions on eHow.com, I peeled back the husks, removed the silk, brushed the cobs with canola oil, reassembled the husks, wrapped each ear in aluminum foil, and placed them in a preheated 350 degree oven for 35 - 45 minutes.  It did not taste particularly roasted ... the method produced more of a steaming effect.  Therefore, when attempting this recipe again, I will cook the corn directly on a grill pan to produce that delicious, smoky, charred flavor, and then cut the kernels from the cob when cool enough to handle (cut off the bottom of the cob, stand it on its cut end, and run a sharp knife down each side of the cob from top to bottom).  The Gluten-Free Goddess suggested roasting frozen corn kernels on a baking sheet for 6 - 7 minutes, so I'm sure that would work well, too.

Cook 1 cup of quinoa in lightly salted water according to the package directions.  Empty into your serving container to cool.  Fluff with a fork.

Add in the fresh chopped cilantro, diced red onion, diced pepper, avocado, and roasted corn kernels.  Drizzle over the extra virgin olive oil and the juice of two limes (this will keep the avocado from browning).  Season with salt and freshly cracked black pepper.  Toss to evenly distribute ingredients.
 

Serve cold or at room temperature.  Serves 8 as a side (161 calories per half cup).


(photo from A Chow Life)

1 bunch collards
4 tbs mayonnaise
4 tbs golden raisins or dried cherries
2 tbs lemon juice (1 lemon)
1 large or 2 medium carrot(s), julienned
2 scallions, finely chopped
2 tbs apple cider vinegar
1 tbs dijon mustard

Pour the raisins or cherries into a little bowl and cover with boiling water.  Let sit for 15 minutes until the raisins or cherries plump.  Drain and dry.

Cut the stems from the collards, stack a few leaves, roll the leaves into a cigar shape, and then slice into a chiffonade.  Place the chiffonaded collards into a colander and rinse well until the water runs clear (collards tend to be dirty).  Dry well in a salad spinner.

Mix the mayonnaise (reduced fat would probably be fine), lemon juice, vinegar, dijon, and scallions to a small bowl and whisk to combine.  Place the collards, julienned carrots, and plumped raisins or cherries in a separate serving bowl and cover with about a half of the dressing.  Toss to coat, and add more if necessary.  Season to taste with salt and pepper.

Serve cold or at room temperature.  Serves 8 as a side (80 calories per 1/4 cup).

This is a great alternative to braised or sauteed collards, which can be quite rich and a bit tired.  I'd suggest giving raw collards a try!

- M

Sunday, August 8, 2010

Give Beets a Chance

A lot of people don't like beets.  I think it's mainly a textural issue.  I just last night thanked my parents for not forcing me to eat such "controversial" vegetables when I was a kid, preventing me from harboring any aversions toward things like beets or Brussel sprouts.  (They did, however, force me to eat peas, which resulted in about a decade-long hiatus until I rediscovered them in dishes like chicken pot pie, shepherd's pie, and pasta with peas and pancetta in a pepper cream sauce.  MMM.)

I'm here to plead with you adults who have sworn off beets to give them another try.  I'm not talking canned beets, '70s-style - I'm talking the crisp, earthy root vegetables that arrive with their stems still intact.  They require a bit more patience and innovation than most (even simply roasting them takes about an hour, and you can kiss your crisp-white cutting boards goodbye), but they're absolutely worth it when done right.  They also provide a lot of nutritional bang for their caloric buck - one serving has only 45 calories yet provides 27% of the daily value of folate, as well as a significant amount of Vitamin C, iron, manganese, magnesium, and "glycine betaine," a blood cleanser.  Not bad, eh?

Nutrition aside, beets are beautiful and delicious when not overcooked.  I'm going to highlight here two ways I've prepared them that have turned out quite well.  The first - Glazed Baby Beet and Carrot Salad with Cumin Dressing by Grace Parisi at Food & Wine - is super fast, easy, and exquisitely flavored.  I'd recommend this dish for those with textural fears, as the vegetables remain quite crunchy.  My father, who was forced to eat soggy canned beets as a child, tried them last night and actually loved them.  I kept things super simple and didn't even bother with the lettuce, feta, and almonds, and it still made for a beautiful side dish.  Simply follow the link above and enjoy!

The second method is a bit more laborious.  Okay, so laborious that a) I probably would have given up had Bethye not been there to (literally) lend a hand, and b) I don't know that I'll ever do it again.  HOWEVER, the recipe makes so much that I still have an entire gallon Ziplock-bag-full in the freezer that I'm sure will be much more enjoyable when I can just plunge them right in the water one day and enjoy a few minutes later.

I'm talking about beet and ricotta gnocchi.

Yes, making gnocchi is a massive pain in the ass.  The finished product is delicious, though (well, the beet gnocchi were great - the sweet potato gnocchi left a bit to be desired), and there's a bit of pride to be had in making it out alive.  I highly recommend having someone else on hand to help out when you're elbow-deep in the stickiest fuschia mess imaginable, preferably someone who's an excellent baker (again, thank you, Bethye).

Another tip is to roast and mash the beets the day before.  That way, the process the day of is a bit quicker and easier.  Good luck!

BEET AND RICOTTA GNOCCHI (adapted from Eat a Beet)

(original photo)

3 small beets, trimmed 
16 oz. fresh ricotta cheese 
1 large egg 
3/4 cup freshly grated Parmesan cheese 
salt and pepper to taste 
1 1/2 cups all purpose flour, divided 

Preheat the oven to 450˚. Wrap the beets in foil and roast until tender, about 1 hour.  Let cool for 15 minutes before removing the skins.  Grate coarsely or mash with a potato masher.  This part can be done the day before. 

Into a food processor, add the beets (about a cup’s worth), ricotta, egg, Parmesan cheese, salt, pepper, and 1 cup flour.  Again, this part can be done ahead and kept in the refrigerator until ready for assembly. 

Lightly dust a baking sheet with flour.  Place the remaining 1/2 cup of flour in small bowl.  Measure out tablespoon-sized scoops of dough, plop into the bowl of flower, and coat.  Shake off the excess, and roll with a gnocchi board or a fork to get the traditional indentations.  (Bethye and I had a tough time with this part, so we just plopped the floured balls onto the baking sheet and pressed them gently with the tines of a fork.  Imitation gnocchi!) 

Yet again, the recipe can be prepared to this point up to 6 hours ahead.  Just cover and chill in the meantime.  Alternatively, place the baking sheet in the freezer until the individual gnocchi are hard, then dump into a Ziplock bag and freeze. 

Put a large, well-salted pot of water on to boil.  Cook the gnocchi until they float to the surface, about 2 minutes.  Cook about another minute, then remove with a slotted spoon. 

Place the gnocchi on plate and sauce appropriately (I made a brown butter sage sauce, which in retrospect was maybe a bit too rich).  Serve immediately, sprinkled with additional Parmesan cheese. 

If after trying both of these recipes you still hate beets, then maybe you should just try using them as dye.  They were certainly effective on my cutting board. 

- M

Breakfast, New and Improved

Yesterday morning, I woke up, threw on a pot of coffee, and got started on breakfast: scrambled eggs with cheese and chives from the garden served with whole wheat toast.  Tasty, sure, but a bit tired.

So when I woke up this morning, I really wanted to try something new.  I flipped on the Cooking Channel and started scanning Tastespotting to see if anything popped up, and lo and behold, "shakshuka" appeared.  It looked delicious - poached eggs nestled in tomato sauce - but I wanted to investigate a bit further.  Queue Wikipedia!

Shakshouka (also shakshuka, shaqshuqa, chakchouka; Arabic: شكشوكة‎; Hebrew: שקשוקה‎) is Middle Eastern dish consisting of poached or fried eggs cooked in a sauce of tomatoes, peppers, onions, and spices (often including cumin, turmeric, and chillies), and usually served with white bread. It probably originated in Tunisia.

I was convinced.

Tastespotting lead me to a shakshuka recipe on a site called "My Jewish Learning."  The fact that this dish was a nod to my heritage was a surprising and added bonus.  I read the recipe, realized I needed to cut it in half (I hate living alone ... come home, Matt!), and went to work.

The recipe recommended cooking the tomato sauce for 30 minutes in a saucepan and then transferring it to a frying pan when poaching the eggs.  This seemed unnecessary to me, so I simply cooked the tomato sauce in the frying pan itself.  Why dirty an extra pot?  I also sauteed the garlic, tomato paste, salt, and paprika for a minute or two before adding the crushed tomatoes in order to really bring out their flavor.

(Note: if you don't have tomato paste in a tube, get some.  Recipes almost never call for a full can - what a waste!)

After the sauce had reduced for about 5 - 10 minutes (during which time I brewed some coffee and toasted two slices of bread), I gave it a taste and felt it was missing something.  I went back to my pantry and decided to add some smoked paprika (very strong stuff - use cautiously) and red chili flakes.  Much better.

The eggs took twice as long to poach than what the recipe called for, but it might have been because I didn't have appropriately-sized lid.  Don't forget to season the eggs themselves with a little bit of salt and pepper.

I finished the dish with a drizzle of olive oil and a sprinkling of Parmesan cheese.  It's pretty hard to go wrong when either of those ingredients are involved.  (I recently started finishing spaghetti this way - once portioned into bowls, I sprinkle the spaghetti with some Parmesan, drizzle over about a teaspoon of olive oil, and dust with freshly cracked black pepper.  It's divine, and actually inspired by that tantalizing De Cecco ad that runs before every episode of Lidia's Italy!)

In short, this dish is a great way to mix up a tired breakfast routine, never mind its low calorie, low fat, antioxidant and lycopene rich characteristics.  It's also incredibly simple and quick.  It would be especially great during Passover - just swap out toast for matzo!

SHAKSHUKA (adapted from My Jewish Learning)

(photo from TravelBlog)

1 14.5 oz can crushed tomatoes
2 – 3 cloves garlic, minced
1 tsp salt
freshly cracked black pepper
1 tsp paprika
¼ tsp smoked paprika
¼ tsp red pepper flakes
2 tsp tomato paste
1 tbs olive oil
1 tbs grated Parmesan cheese
1 tbs minced fresh herbs (e.g. thyme, sage, parsley, basil) if desired
2 – 4 large eggs
2 – 4 slices of hearty bread (or matzo during Passover)

Heat 1 tbs of olive oil over low heat.  Add the minced garlic, salt, paprika(s), pepper flakes, and tomato paste and sautee for 1 – 2 minutes, until fragrant and slightly softened.  Add the crushed tomatoes and stir to combine.  (If using fresh herbs like thyme or sage, add now.  If using fresh herbs like parsley or basil, add just before serving.)

Allow the sauce to thicken over low heat for 5 – 10 minutes, stirring occasionally lest it burn.  Toast the bread while the sauce thickens.

Once the sauce is ready (make sure to taste and adjust seasonings if necessary), crack 2 – 4 eggs into the pan, depending on how many people want to eat.  Season each egg with a tiny pinch of salt and pepper, and gently pierce each yolk with a fork.  Cover tightly and poach until set, approximately 4 – 6 minutes.

Remove from the heat, drizzle with olive oil and Parmesan cheese (and fresh herbs if you have them, like parsley or basil), and serve in the pan with toast on the side.

You could easily make this an “anytime” meal by serving it with a simply dressed green salad and a big glass of red wine.  Give it a try!

-M