skip to main |
skip to sidebar
A lot has happened over the past few months that has prevented me from posting - renting our old apartment, finding our new apartment, moving from one to the other, work, friends, life ... you know, the usual(!).
However, I had a culinary experience last night revitalizing enough to inspire me to post, and it was as simple as Deviled Eggs.
We had been invited to a holiday party by our friends Carla and Ruairi, and I didn't want to show up empty handed. For some reason, Deviled Eggs were the first holiday finger food that came to mind. I'd never made them before, but in my experience, anything involving eggs is pretty damn easy.
After braving the most terriyfing Market Basket experience I've ever had (which is saying a LOT), I had what I needed: 1 dozen eggs and a bunch of scallions. Really, that's all I needed that I didn't already have in my refrigerator.
I hard boiled the eggs (and only had one explode in the process), shocked them in ice water, peeled them, cut them in half, took out the insides, mixed those with all sorts of deliciousness, slopped 'em into a make-shift piping bag, squeezed 'em out into their original egg white homes, and sprinkled the results with paprika and scallions (because chives weren't available).
They were so good, and so retro-Christmasey. They looked pretty darn good, too!
CURRIED DEVILED EGGS (adapted from the petite pig)
(original photo)
1 dozen eggs (I used organic free range because I'm a sucker)
3/4 cup of mayonnaise
1 TBS dijon mustard
2 TBS curry powder
1 TBS paprika
1 tsp salt
1 bunch scallions or chives
1. Place eggs in a large saucepan, cover with cold water (by at least an inch), and add a liberal amount of salt. Cover and bring to a boil over high heat. Once boiling, turn off the heat and wait for 12 minutes. In the meantime, fill a large bowl with ice water. After 12 minutes, remove the eggs with a slotted spoon and place in the ice water to halt the cooking process.
2. Once the eggs are cool enough to hande (which shouldn't take long), peel off the shells. I like to gently tap them on a cutting board until the whole surface is covered in tiny cracks and then remove the peel under running water. Be careful not to rip the white!
3. Cut the eggs in half lengthwise. Remove the yolks and place in a mixing bowl. Arrange the whites on a serving platter.
4. Add the mayonnaise, mustard, curry powder, and salt to the yolks. Mash until smooth. Add a stalk or two of finely minced scallions and stir again.
5. Add the yolk mixture to a large ziplock bag (or a pastry sleeve, if you have one). Cut off one of the bottom corners of the bag with a pair of scissors - cut off a small amount if you want a thin output, and a large amount if you want it thick. Then, squeezing from the top of the ziplock bag (I twisted the bag where the filling began), pipe a tablespoon or two of the yolk mixture into each of the egg white halves.
6. After all of the filling has been added, sprinkle the eggs with a dusting of paprika (if you sprinkle from up high, the coverage will be lighter and more evenly distributed). Then, if desired, add some more scallions, finely sliced on the bias.
Delicious, simple, and cheap. You kind of can't go wrong.
Happy Holidays!
- M
Growing up, I always got really excited when my Dad decided to make breakfast for dinner. It was usually some combination of eggs, bacon, homefries, toast, and maybe a little something extra, like pancakes. It's not something I normally do now, but after a long, exhausting day and a massive lunch I'm pretty sure I was still digesting at 7 PM (a cheeseburger and a beer, compliments of John Harvard's), I wanted something easy, fast, and light.
Remembering that I'd purchased some delicious tomatoes on vine the night before, I recalled a recipe I'd recently clipped from Real Simple for Fried Eggs and Broiled Tomatoes. I don't even particularly like cooked tomatoes (except in tomato sauce), but I saved the recipe anyway for two reasons: a) the picture was pretty, and b) the cook time was virtually negligible.
From start to finish, this meal couldn't have taken me more than 5 minutes, and despite our skepticism, Matt and I were both pleased with the results. It was light, flavorful, and well-balanced, especially after combining it with a simple side salad. Salad with breakfast is another thing I borrowed from my Dad. I merely washed and dried some chiffoned green leaf lettuce and tossed it with salt, pepper, and Ken's Steak House Lite Balsamic Vinaigrette. It really helps contextualize the eggs, which can by nature be a little heavy.
I recommend this meal as a way to liven up your weeknight regimen and keep things fresh. It's as close to instant gratification as a meal can get without using pre-packaged foods and/or a microwave (not that those don't have their time and place, believe you me).
I think my Dad would approve.
FRIED EGGS WITH BROILED TOMATOES (modified recipe)
 (photo from Real Simple)
2 medium tomatoes, washed, dried, and halved
2 teaspoons olive oil
1 pat of butter
kosher salt and black pepper
2 large eggs
1 tablespoon grated Parmesa
Turn broiler on high. Place tomatoes, cut-side up, on a baking sheet. Drizzle with olive oil and dust with freshly ground salt and pepper.
Heat nonstick skillet over medium-low. Melt butter.
Place tomatoes in oven.
Once pan is hot and butter is melted, crack two eggs directly into the pan. Dust with freshly ground salt and pepper. Flip after a minute or so.
Check on the tomatoes. Remove once the tops start to bubble. The eggs should be ready at this point as well.
Place two tomato halves, one egg, and a small pile of salad on the plate. Sprinkle the tomatoes and/or eggs with parmesan cheese and serve.
- M
(photo from Real Simple)
2 medium tomatoes, washed, dried, and halved
2 teaspoons olive oil
1 pat of butter
kosher salt and black pepper
2 large eggs
1 tablespoon grated Parmesa
Turn broiler on high. Place tomatoes, cut-side up, on a baking sheet. Drizzle with olive oil and dust with freshly ground salt and pepper.
Heat nonstick skillet over medium-low. Melt butter.
Place tomatoes in oven.
Once pan is hot and butter is melted, crack two eggs directly into the pan. Dust with freshly ground salt and pepper. Flip after a minute or so.
Check on the tomatoes. Remove once the tops start to bubble. The eggs should be ready at this point as well.
Place two tomato halves, one egg, and a small pile of salad on the plate. Sprinkle the tomatoes and/or eggs with parmesan cheese and serve.
- M
I took the plunge. I tried making Thai food.
It was OK. It was a fairly hefty amount of work with not as much pay-off as I would've liked, but despite the lackluster results, I'm still glad I gave it a go.
The challenge was this: I wanted to make a meal using what I had at home, but I didn't want it to be either a) pasta + stuff, or b) chicken + veggie + rice. Though there's absolutely nothing wrong with either of the preceding options, I wanted to push myself.
I knew I had 2 lbs. of frozen shrimp at home, so I visited Tastespotting (one of my favorite recipe sites) and searched for "shrimp." After sifting through 22 pages of results (yes, really) and recording my findings, I had in my possession a recipe for Garlic Shrimp in Coconut Milk from the blog *crispy waffle*.
1 hour and 4 pots later (including the one I used to make fresh boiled edamame, compliments of Boston Organics), I had a fairly good dish. It was a bit too sweet, a bit too salty, and a bit too plain, but it was a start. For anyone who wants to try this recipe, I would suggest adding a vegetable - celery, bell pepper (any color), baby corn, scallion, carrot, broccoli ... anything.
Asian cooking has always scared me, but at this point, I do have most of the basics in my cupboard and refrigerator: fish sauce, oyster sauce, Hoisin, rice wine vinegar, wok oil, sesame oil, hot sesame oil, dried Thai chiles, ginger, rice, garlic, etc. With a few more key ingredients on hand (first and foremost, Sriracha) and a couple more test-runs under my belt, I should be well on my way.
Oh ... and I need to buy a wok.
EDAMAME (modified recipe)

(photo from sweet fine day)
Cook fresh pods (or shelled beans) in boiling salted water for 3 to 5 minutes. Drain, spread over a folded paper towel on a plate, and let cool for a minute. Add plenty of salt.
Frozen edamame, in or out of the pod, have been lightly blanched and require less cooking. In most cases, you can simply follow the instructions on the package.
GARLIC SHRIMP IN COCONUT MILK (modified recipe)

(photo from *crispy waffle*)
1-1/2 pounds shrimp with the heads on ***
1 can (13.5 oz) coconut milk
2 tbs. crushed red pepper flakes
6 to 7 cloves of garlic, minced
1 cup of any Asian-type vegetable (bell pepper, baby corn, water chestnut, etc.)
1 tsp. salt
2 tsp. fish sauce
minced parsley or cilantro (for garnish)
cooked rice
*** To defrost frozen shrimp, I simply put them in a bowl in the sink and fill it with room temperature water. Give them a swirl and turn on the faucet for a few seconds every couple of minutes, and in no time (under 10 minutes, I would guess), you have gently (and thoroughly) thawed shrimp.
Skim about 2 tbs. of the cream off of the top of the coconut milk and set aside.
Remove the shells and heads from the shrimp and set in a medium saucepan. Pour the remaining coconut milk over it and add the salt. Bring to a simmer over medium heat. Cover and continue simmering for 15 minutes. Check it -- the coconut milk should now be slightly pink. Drain the coconut milk through a strainer and set aside.
Heat a wok or large skillet to medium high. Add the coconut cream (and add a little vegetable oil if there is not enough oil at this point). Add the shrimp and crushed red pepper flakes and sautee for 2 minutes until the shrimp is nice and pink. Add the garlic and vegetables and stir-fry for another minute or so. Now add the coconut milk and fish sauce and simmer for another minute.
Remove the shrimp and vegetables to the serving dish. Continue simmering the coconut milk for a few more minutes, until it has thickened slightly (you can decide if you like it thicker or thinner at this point - if you like it thicker, just continue to simmer for a bit longer). Taste to see if it needs more salt (it probably won't!). Pour the coconut milk over the shrimp.
Garnish with the parsley or coriander and serve with steamed rice (I cooked mine with butter and sesame oil - err on the side of dry, not wet).
- M
I have a fairly poor track record with soup - it never seems to taste quite right or have the ideal consistency. The real kicker is that it always seems to take quite a fair amount of time, too. Chopping, peeling, stirring, sweating, blending, simmering, reducing ... all that for a thin, tasteless result? It's disheartening, to say the least.
The apex of my struggle with soup was the infamous "butternut squash incident" last fall. I had in my kitchen 2 butternut squash and a giant bag of apples from Honey Pot Hill Orchards, and I found what I thought was the perfect recipe on the Food Network website: Butternut Squash and Apple Soup Recipe by Michael Chiarello.
On the way home from work, I stopped off at Porter Square to visit Tags Hardware and buy a large soup pot and an immersion blender. This was the only successful portion of the evening. I was helped by a fabulous (and I do mean fabulous) man who was very into my cause and passionate about all things food; he talked at length (...) about his cooking show on the local TV channel. Most importantly, however, was that he alerted me to the current deal on Le Creuset cookware: because it was an unpopular color (which I happened to love), the kiwi green 8 qt. stock pot was only $50. I nearly fainted. He also pointed out his favorite immersion blender which I happily added to my cart.
I then proceeded next door to the Shaw's Supermarket to buy about $40 worth of spices in addition to the other basics I needed. I then waited 20 minutes for a cab because although my apartment was only about a half a mile away, I had too many heavy bags to carry to make the trek alone. By the time I got back to my place, I was exhausted, starving, and out about $150. However, I was convinced this soup would be gorgeous and that Matt would be thoroughly impressed when he got home.
I spent a good hour prepping the ingredients, including peeling and cubing 6 cups worth of butternut squash and 3 cups worth of apples, chopping and rinsing 2 leeks, and toasting and pulverizing my own spice mixture in a coffee grinder. The kitchen was hot and covered in debris, but I was convinced the results would make each step of my fairly epic journey worthwhile.
The leeks were in, the garlic was in, and then the butternut squash and apples were in, all nesting happily in my fantastic new pot. I then read the next line of the recipe: "Stir in the Toasted Spice Rub and cook briefly to toast it, about 1 minute." Happily, I took what I had made and dumped it in the pot, and in horror, immediately realized what I had just done.
If you take a look at the recipe, you'll see that the auxiliary recipe for the Toasted Spice Rub yields about 1 cup. In the ingredients list for the main recipe, you'll note that the soup only calls for 2 TEASPOONS of said Rub. However, when rushing about the kitchen and glancing back and forth from the recipe to the food, one doesn't necessarily check the amount in the ingredients list. Why would they have you make 1 cup of the Rub when you only need 2 teaspoons worth? Why, Michael Chiarello - WHY?!
The ingredients in the pot were pitch black, every nook and cranny caked with that infernal Rub. The kitchen reeked of fennel and coriander. This was the exact moment in which Matt came home. "Jesus, what's that smell?" he asked. I didn't cry, I didn't give up - I got angry. I was determined to make it right. I was not about to let $150 and 2 hours of my time go to waste.
So, I dumped the contents of the pot into a colander and ran it under cold water for about 10 minutes, stirring it with my hand. I then left that to drain and thoroughly scrubbed the pot. After drying the pot and returning it to the stove, I added back the squash, apple, and leeks, and continued as if nothing had gone awry.
Even after adding about a cup of heavy cream (which the recipe didn't even call for), it was still spicy as hell. I finally admitted defeat. I watched Matt choke down each sip with the loving determination any terrified pseudo-house-husband would, and I vowed I would never make the same mistakes again.
I've tried all sorts of soups since then: Celery and Potato, Silky Cauliflower Soup with Parmesan Crisps (at least the crisps were good ...), Cannellini Bean Soup with Kale, and so on. Still, the only soup I'd ever made and liked was matzo ball soup, and I make the broth from boullion cubes and the matzo balls from a box (for the record, I think Goodman's is better than Manischewitz). How is it that I can make things like beef brisket and pork chops taste good and I can't manage to make a simple cup of soup? I began to think that maybe I just don't even LIKE soup.
Yet I keep on trying, probably because it's inexpensive (as long as you don't set out to make your own goddamn toasted spice rub) and easily frozen and reheated later. Also, it seems that whenever I have a lot of one ingredient in my kitchen that I want to use up, most of the recipes that I find are for soups. This is exactly how I ended up taking on Chilled Carrot-Ginger Soup this weekend.
I had an impressive collection of local organic carrots in my refrigerator that I wanted to use (compliments of Boston Organics, of course), and I remembered that one of my first positive soup memories was the result of a special lunch with my mother at The Coach Grill when the soup du jour was carrot dill. I was convinced I wouldn't like it, but I was pleasantly surprised - it was creamy, smooth, and delicious.
I found a recipe online by a woman who calls herself the Cowgirl Chef. The picture was beautiful and the ingredients were simple, not to mention the fact that I had them all in my kitchen already. I also wanted a recipe that could be eaten hot or cold, considering that Boston was in the midst of a suffocatingly humid heat wave.
I hesitated when the recipe called for water as the main liquid, as opposed to something with more flavor like vegetable stock. Also, it seemed like a little much to add enough so that the carrots would be submerged by a couple of inches. However, since I seem to have such poor soup instincts, I decided to follow each step to the letter ... and what I ended up with was watery, tasteless soup. I tried adding salt, pepper, a tablespoon of honey, and even the juice of one orange, but nothing seemed to make much of a difference. I kept the soup at a simmer thinking that reducing it couldn't hurt, and I turned to a discussion board I frequent and asked the resident chefs what they would suggest for improvement. I received many helpful suggestions, the best of which (I thought) was to throw in a boullion cube. Genius! Another suggested adding curry, since it would enhance the flavor and work well with the already-present cumin. I added both and reduced the soup for about 45 minutes. The results were fantastic. I had FINALLY made a paletable soup.
Unfortunately, when I had it for lunch at work the next day, I discovered that it's not quite as good cold as it is hot. However, I'll settle for this one small victory, and maybe with these new flavor-enhancement tricks under my belt, the next soup I try will be even better.
CHILLED CARROT GINGER SOUP (modified recipe)

(photo from Cowgirl Chef)
2 lbs carrots, peeled and sliced
1 box (or two cans) vegetable broth or stock
1 medium yellow onion, diced
2 tbs fresh ginger, grated or finely diced
the juice of 1 orange
1 tbs olive oil
1 tbs butter
1 tbs honey
1 tsp cumin
1 tsp curry
salt & pepper
cilantro for garnish
Add the olive oil and butter to a stock pot over medium-low heat. Once the butter has melted, add the onion and sweat until translucent (approximately 10 minutes). Add the carrots, ginger, cumin, curry, and salt & pepper, and stir to coat. Cook for about 2 minutes.
Add enough stock to cover the vegetables. Bring to a boil. Once a boil has been reached, lower the heat and simmer for about 45 minutes until the carrots are tender. Turn off the heat and blend until smooth. Add the orange juice and honey and and blend again. Taste and adjust seasonings as needed.
Serve hot or cold with cilantro as garnish. A dollop of sour cream, yogurt, or creme fraiche might also be nice.
- M
What a fantastic invention. I would like to personally thank whoever is responsible for the indoor non-stick grill pan. The list of virtues is long and includes beautiful grill marks, quick cooking, extra flavor, and easy clean-up.
I'd spent about a week trying to decide what to do with the 2 zucchini and 1 summer squash lurking in our refrigerator, but it wasn't until a particularly hungover Saturday afternoon (oh, Razzy's ... you and your karaoke get me every time) that I was ready to take the plunge.
I rifled through my extensive collection of recipe clippings (organized by category in white envelopes ... what? I don't have a problem) and settled on "grilled zucchini salad with lemon and scallions" from Real Simple magazine. Because my life is one giant carbo-load, I decided to make it into a pasta salad. I also threw in some feta cheese because ... well, do I really need an excuse to add cheese?
This meal clearly needed some protein, so I took 2 chicken breasts out of the freezer and started the defrosting process. Again, I searched through my recipe clippings and found another Real Simple recipe for "sweet and spicy chicken." The recipe was actually intended for roasting a whole chicken, but I figured that the marinade would work just as well for grilling. Fortunately, I was right.
[One note about the brown sugar called for in this recipe: on Ask Aida earlier that morning (GOD I hate her sidekick), a viewer had sent in a question about the difference between light and brown sugar. While I don't remember the explanation regarding the difference, I did catch her saying that when a recipe simply calls for "brown sugar," use light and you can't go wrong.]
I do my best in these posts to link to the original sources of inspiration as much as possible. However, the Real Simple recipes are not available online, and since I don't have a scanner, my options are limited. Also, since I heavily modified each recipe (from a grilled zucchini salad to a pasta salad with zucchini and squash, and from a whole roasted chicken to individual grilled breasts), I figured it would be OK to post my versions as their own. Real Simple, if you're reading this, please don't sue me. I love you.
PASTA SALAD WITH GRILLED ZUCCHINI, SUMMER SQUASH, LEMON, FETA, AND SCALLIONS

(original photo)
INGREDIENTS
2 zucchini
1 summer / yellow squash
6 scallions
1 lemon
1/4 tsp crushed red pepper flakes
1 pkg. farfalle (bow tie) pasta
1 pkg. solid feta cheese
Olive oil
Salt and pepper
1. Put a large pot of water on the stove to boil. Salt heavily. Preheat your grill pan over medium heat.
2. Slice the ends off the zucchini and squash and then halve lengthwise. Drizzle the cut side with olive oil and rub it in with your fingers (or a basting brush if you have one). Grind on some salt and pepper. Once the grill pan is hot, put in the veggies cut-side down.
3. Once the veggies have significant grill marks, drizzle the top sides with olive oil and add salt and pepper. Turn over and cook the other side.
4. Once the water has come to a rolling boil, add the pasta (you should always have significantly more water than pasta). Stir to prevent sticking. When the pasta is al dente (usually around 7 minutes - taste to check), drain and rinse under cold water.
5. When the veggies have grill marks on each side and feel tender but not soggy, remove from the heat and allow to cool.
6. Pour a couple of tablespoons of olive oil into the bottom of a large bowl. Cut the lemon in half and squeeze the juice into the bowl (you can either squeeze them with the cut side up or squeeze them over your hand to catch the seeds in your fingers). Slice the scallions on a bias and add to the mixture. Add the salt and the crushed red pepper flakes and stir.
7. Once the veggies have cooled, slice them into half-moons. Add the cool pasta and the veggies to the large bowl with the dressing. Toss to coat. Break up the feta with your fingers over the bowl. Toss to combine.
NB: This was a pretty mild dish. In the future, I might add a splash of red wine vinegar for tartness or a handful of fresh herbs (parsley, mint, basil, etc.) for brightness.
GRILLED SWEET AND SPICY CHICKEN BREASTS

(original photo)
INGREDIENTS
Olive oil
1 tbsp. chili powder
1 tbsp. brown sugar
1 tsp. dried oregano
Salt and pepper
2 - 4 boneless skinless chicken breasts
1. Preheat your grill pan over medium heat. Spray with non-stick cooking spray.
2. In a medium-large bowl, combine a few tablespoons of olive oil with the chili powder, brown sugar, and dried oregano. Add some freshly ground salt and black pepper.
3. Add the chicken breasts and coat well. (NB: I've found that when grilling chicken, it's easier to keep the pieces moist when they are thin. Since the breasts I used were super thick, I decided to butterfly them. This way, by the time you've gotten a nice sear on each side, they're cooked all the way through. When they're very thick, you have to turn the heat down to low and cover the pan with tented aluminum foil in order to cook them all the way through, risking drying out the meat.)
4. Once coated, shake off the excess marinade and add the breasts to the pan. Cook for approximately 5 - 6 minutes on each side until seared and crusty on the outside and just barely cooked through on the inside.
5. Let the chicken "rest" before serving and slicing. This allows the juices to redistribute rather than running out the second they're cut.
This is a great and healthy way to enjoy chicken. The combination of spicy and sweet is a treat for the taste buds. Served with the cool pasta salad, this is a fantastic summer meal.
- M
With every Sunday morning comes a few standard questions, like "just how late can I sleep in?" and "how exactly am I going to procure my first cup of coffee?" Today those answers were "only 9:15 - really?!" and "by prodding Matt awake after 2 hours of attempting to entertain myself."
I cannot brew a good cup of coffee for the life of me, so if I'm on my own, it's off to Dunkin' Donuts. However, on lucky mornings like this one where with a few good swats of a pillow I had roused my roomie, there was a pot brewing in no time.
After sipping my hand-delivered coffee in bed, I was ready to tackle the issue of breakfast. All it took was cracking open the refrigerator door.
Boston Organics had delivered a bunch of asparagus the Friday prior. They were big, bright, and beautiful - just begging to be eaten - and the first mode of cooking that game to mind was grilling. I pictured those diagonal marks seared into each stalks and there was no turning back.
Paired with a simple breakfast sandwich - egg, tomato, English muffin, and cheese - this was a quick and easy breakfast that I will surely repeat. This was more than enough for Matt and I (we each had two sandwich halves and a large stack of asparagus), so depending on how hungry you and your company are, it could serve up to 4.
BREAKFAST SANDWICH with GRILLED ASPARAGUS (original recipe)

(original photo)
INGREDIENTS
Sandwich:
2 English muffins
4 eggs
4 slices of sharp cheddar cheese
1 medium tomato
Butter
Salt and pepper
Asparagus:
1 bunch of asparagus spears
Olive oil
Salt and pepper
1. Turn the oven broiler on low. Preheat your grill pan over medium heat.
2. Wash and dry the asparagus. Break off the woody bottoms by holding one end in each hand and bending the spear away from you. They will break in the appropriate place. (You can also just chop off the bottoms all at once if you'd like, but I've found snapping them to be the most accurate method in terms of separating the tender bit from the inedible ends.)
3. Place the asparagus on a plate and drizzle with olive oil. Add freshly ground salt and pepper. Toss to coat. Place the asparagus in the grill pan so that they sit perpendicularly to the ridges. Turn after about 7 minutes and finish cooking on the other side.
While the asparagus grills ...
4. Preheat a frying pan over medium-low heat. Melt a pat or two of butter into the pan.
5. While the butter is melting, separate the English muffins into halves and place onto an aluminum foil-lined sheet pan. Place under the boiler for only a minute or two until very lightly toasted.
6. Crack four eggs into the frying pan. Grind some salt and pepper over each egg.
7. While the eggs cook, wash and slice the tomato and butter the English muffins.
8. Once you've flipped the eggs and they've finished cooking, assemble your sandwiches on the sheet pan: buttered English muffin half, 1 slice of tomato (salted), 1 fried egg, 1 slice of cheese (I used sharp cheddar, but something like Monterey Jack or Swiss would be nice, too). Place under the broiler to melt the cheese. NB: DO NOT LEAVE THE SANDWICHES UNATTENDED. Broilers are something fierce. This should only take one or two minutes, tops.
E voila! Timing the asparagus and the sandwiches can be a bit difficult, but err on the side of the asparagus being done first. Better they wait for the sandwiches than the sandwiches wait for them.
- M
I recently attended a Birthday BBQ Potluck - the perfect opportunity to use those fingerling potatoes I'd received in my last Boston Organics shipment. My goal was to find a tasty potato salad recipe that didn't require tons of ingredients I didn't already have hanging around my pantry and/or fridge.
One recipe in particular stood out to me: 28 Cooks' Potato Salad with Chili-Cumin Vinaigrette. It was just what I was looking for: a no-mayo potato salad with a kick, and all I needed from the store were dried thai chiles and fresh cilantro. (Times are tough, man. Wallets are tight.)
Matt kindly offered to do the shopping. He called me from the store: "They don't have dried Thai chiles," he said, and proceeded to list the names of the dried chiles they did have, one of which was "japones." I quickly Googled the name and found that they're frequently used in Thai cooking, so I figured that the match would be close enough. Visually they're very close as well:
 Dried Japones Chiles
[PHOTO]
Dried Thai Chiles
The level of heat in the final product was perfect, so the gamble paid off.
I made a few more substitutions. Instead of using whole cumin seeds, toasting them, and then grinding them, I simply used cumin powder. Also, instead of using a food processor (I don't have one!), I minced everything by hand, added the vinegar, and then drizzled in the olive oil while mixing with a whisk. The dried chiles were tough to mince - the skins were unyielding and the seeds flew everywhere - but using my trusty chef's knife, I was able to get the job done.
I substituted shallots for onion to add a little sweetness, and though I didn't realize it until just now when looking over the original recipe, apparently I forgot the red onion completely. I love myself some red onion so I might include it next time, but honestly? I didn't miss it.
I also decided to add in some hard boiled eggs. I had seen them listed as an ingredient in other potato salads and couldn't deny the craving. I've made hard boiled eggs before, but nonetheless decided to Google a quick how-to. The eHow directions below really did the trick, though I still found peeling them to be a little difficult even while running them under cold water.
One final note: the recipe calls for "seasoned rice vinegar," and since I assumed there wasn't a difference at the time, I used rice wine vinegar instead. Upon further investigation today, I've discovered that "seasoned rice vinegar" is in fact rice wine vinegar with sugar and salt added (see Cook's Thesaurus: Vinegars for a more detailed explanation). My salad tasted great with plain old rice wine vinegar, and since the recipe calls for salt and sugar to be added anyway, I doubt there would have been a drastic difference had I used the seasoned rice wine vinegar instead.
So here they are: instructions on how to make hard boiled eggs and the recipe for Potato Salad with Chile-Cumin Vinaigrette. I highly recommend you include this salad in your next BBQ. Your kitchen may smell like sulfur for the rest of the day, but it's worth it, my friend. It is so, so worth it.
HOW TO MAKE HARD BOILED EGGS (unmodified recipe)

(photo from our recipe garden)
Find a pot or saucepan that is big enough to hold the amount of eggs that you want hard-boiled. Depending on the size of your pot or saucepan, you can cook as little or as many eggs as you desire. Just make sure that you leave room for enough water to cover the eggs completely.
Place your eggs into the pot or saucepan. Use caution when doing this step. Eggshells are designed to be strong containers, but they don't stand up well to knocking or dropping. Gently setting the eggs by hand into your pot or saucepan is going to be your best bet.
Cover the eggs with at least one inch of cold water. Place a lid on the pot or saucepan.
Set your burner to a high heat. Allow the water to come to a rolling boil. This usually takes about 10 to 12 minutes.
Remove your pot or saucepan from the heat. Let the eggs sit in the hot water for an additional 10 to 12 minutes. Now run cool water over the eggs until they are cool enough to handle. After letting the cool water run onto the eggs, you should let them sit in it for a few minutes. This will allow the eggs to fully cool before you handle them.
Crack your eggs by rolling them on a hard surface. Then peel and enjoy!
POTATO SALAD WITH CHILE-CUMIN VINAIGRETTE (modified recipe)
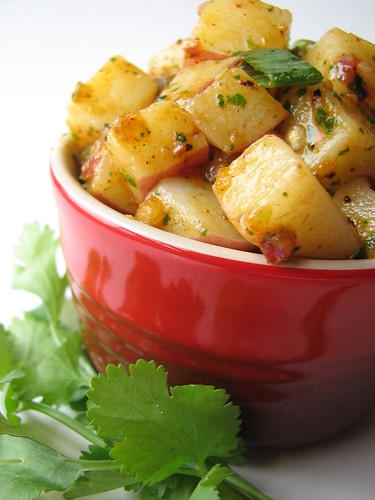
(photo from 28 Cooks)
potatoes (fingerling, yellow, red)
salt
4 hardboiled eggs, chopped
2 green onions / scallions, sliced on a bias
1 tsp cumin powder
4 dried japones chiles, minced
1/2 c fresh cilantro, chopped
1/2 jalapeno (some seeds removed), minced
1 tsp minced shallot
1 clove garlic, minced
6 Tbsp rice wine vinegar
1/4 c olive oil
1/2 tsp sugar
Salt and pepper to taste
Cut the potatoes into 1/2" - 1" cubes, place into a large pot, and cover with 1" of cold water. Season the water with a fair amount of salt. Bring the water to a boil and cook for roughly 25 minutes. The potatoes are done when they are knife tender. Drain and allow the potatoes to cool in the colander.
In a small bowl, combine the chiles, cilantro, jalapeno, shallot, garlic, scallions, cumin, sugar, and rice wine vinegar. Slowly add olive oil while whisking until the dressing is emulsified. Season to taste with salt and pepper.
Combine the cool potato and egg pieces in a large bowl and pour the vinaigrette over the top. Toss to coat. Serve at room temperature or chilled.
- M
I consider myself to be "Jew-ish," a reflection of the fact that though an atheist, I was raised Jewish and still identify culturally as a Jew. The food, the names, the traditions - it's all a part of me, in spite of being a hybrid by blood.
A year or so ago I started cooking for family gatherings. It began with an innocent offer to provide a side course for Rosh Hashana. I roasted up some root vegetables and expected little-to-no fanfare. The result, however, was quite the opposite. "Delicious!" "I can't believe how good this is!" "Can I have the recipe?" I was shocked ... and hooked.
After the root vegetables were such a hit, my attempt at dessert met with a much lesser degree of success. (Who knew that macaroons - which require a grand total of 4 ingredients - could be so finicky?!) Kugel, however - an entree/dessert hybrid - has always been good to me. The recipe I use is by Kraft (yes, Kraft). It turns out beautifully every time, albeit using less vanilla than listed.
And finally, the pièce de résistance, the Holy Grail of Jewish cuisine: beef brisket.
Growing up, the brisket was always provided by my late Great Aunt Zelda. I'm not even sure I was aware of what I was eating at such a young age, but it didn't matter. What I knew was that it was delicious, and unlike anything else I had ever eaten. The smell is beyond comforting - it's right up there with the cookouts on her screened-in back porch: boiled corn and hamburger patties with onion bits mixed in to keep them moist. After eating, we'd stroll down to the Barrington beach at the bottom of the hill to collect shells and sea glass, making sure not to let the cat out the front door. I miss those days.
When I offered to make brisket for Passover this year, I don't know what I was thinking. I had done a test run of Ina Garten's recipe a few months prior when preparing a Jewish meal for Matt's very Protestant family over Christmas break. Even though they had never had anything like it, they loved it, which I figured was either a really good sign or a terrible indication of its authenticity. Despite my doubts, I decided to go for it ... and it turned out great.
ROASTED ROOT VEGETABLES (original recipe)
[PHOTO]
In a 9" X 13" oven safe baking dish, arrange similarly-sized chunks of your favorite root vegetables in a single layer. I like to use carrots, parsnips, sweet potatoes, turnips, and onions, and beets. I've used whole cloves of garlic as well, though it's just as effective to sprinkle some garlic powder over the top.
Drizzle with olive oil and dust with your favorite spices and/or dried herbs. You can use whatever you'd like: paprika, cumin, rosemary, sage, thyme, parsley, etc. Season liberally with salt and pepper, then give everything a good toss and place in a pre-heated 400 degree oven.
The key here is to ride that very fine line between caramelization and burning. Cook time is generally around one hour, but after the first half hour has passed, make sure to check on them every 10ish minutes to toss the vegetables and prevent sticking. When ready, they should be crispy and fork tender.
NOODLE KUGEL (modified)

(photo from Kraftfoods.com)
1 container (16 oz.) low fat cottage cheese
1 container (16 oz.) sour cream
1 cup sugar
5 eggs, beaten
1/2 cup (1 stick) melted butter
1 tsp (NOT Tbsp) vanilla extract
1 large package (16 oz.) broad egg noodles (Kosher for Passover), cooked in salted water, drained, and tossed back into the pot and stirred with a pat or two of butter just for good measure
1 Tbsp cinnamon sugar (simply combine cinnamon and sugar in small bowl - should be a very light brown color when combined)
1 cup golden raisins (optional)
Preheat oven to 350 degrees. Mix cottage cheese, sour cream, sugar, eggs, butter, vanilla, raisins (if you'd like), and cooked noodles in a 9" X 13" greased baking dish.
Sprinkle the top with cinnamon sugar.
Bake for 50 minutes to 1 hour or until center is set. Cool at least 10 minutes before cutting to serve.
BRISKET WITH CARROTS AND ONIONS (unmodified)
[PHOTO]
6 to 7 pounds beef brisket
2 Tbsp kosher salt
2 tsp freshly ground black pepper
1 Tbsp minced garlic (4 cloves)
2 tsp dried oregano leaves
1 pound carrots, peeled and cut into 2-inch chunks
8 stalks celery, cut into 2-inch chunks
6 yellow onions, peeled and sliced
6 fresh or dried bay leaves
1 (46-oz.) can tomato juice
Preheat the oven to 350 degrees.
Place the brisket in a heavy roasting pan. In a small bowl, combine the salt, pepper, garlic, and oregano. Rub the mixture on the brisket. Pile the carrots, celery, onions, and bay leaves on the brisket and pour in enough tomato juice to come about 3/4 of the way up the meat and vegetables. Cover the top of the pan with 2 sheets of parchment paper, then with aluminum foil. (The tomato juice will react unpleasantly with the aluminum foil if they touch.)
Bake for 3 1/2 hours, or until the meat is tender (NOTE: you could cook this forever ...). Remove the meat from the pan and keep it warm. Place the pan on 2 burners and boil the vegetables and sauce over medium heat for another 30 minutes, or until the sauce is thickened.
To serve, slice the meat across the grain. Serve with the vegetables.
- M
As with clothing and shoes, there are loads of kitchen items I covet:
KitchenAid 12-Cup Food Processor
KitchenAid Artisan Stand Mixer
Weber Grill
All-Clad Roasting Pan
Le Creuset Round Dutch Oven
... the list goes on.
However, what I DO have and could not go without is (hold your tongue, haters) my Rachael Ray knives by Furi:

This apartment-warming gift from my Dad was a set of two (7-inch and 5-inch, I believe) in a custom bamboo case. They've held up quite well, though they dulled a bit after a year or so. Matt bought me the special sharpener and it does a pretty good job (though I remain convinced I'm using it incorrectly ... the thing is crazy).
I love these knives and use them every day. Paired with a plastic cutting board, there's no stopping them. Just remember: the safest knife is a sharp knife.
- M
Matt and I attended a Cinco de Mayo dinner party last night for which I offered to provide salsa, guacamole, and tortilla chips (Matt contributed two growlers of beer, which apparently wasn't enough for 5 twenty-somethings). A brief Google search brought me to Simply Recipes: Perfect Guacamole and Mango Salsa.
Due to only semi-ripe mangos (see "How to Select and Store Mangos" for tips I could've used yesterday) and a sub par dicing job on my part, the salsa was merely "good." The guacamole, however ... it was up there with the best I've ever had.
I used habanero chilis (no, not "habañero") and decided to include the seeds and the ribs. (NOTE: I'm not 100% sure they were habaneros since the grocery bin was unmarked, but judging by the pictures I've found, it seems to be the closest match.) Aside from the occasional blast, the overall heat factor was excellent.
When I purchased the avocados on Sunday, they were not yet fully ripe. However, time was of the essence and all the other stores were closed, so I figured I'd give the old "ripen in a brown paper bag" trick a try. Much to my excitement, it worked! By the next night, they were ready for scooping. (Vicki and Dumbo were more than happy to lick the spoon when I was done.) The recipe calls for mashing with a fork, but because I was doubling the recipe, a potato masher was much more appropriate.
My final note regarding these two recipes: if you don't have one already, invest in a hand juicer. We use a very simple plastic juicer like this (I honestly don't even know where it came from), though I would imagine the wooden variety would work well too - just make sure to watch for seeds if juicing a non-seedless fruit.
PERFECT GUACAMOLE (adjustments made)
 (photo from SimplyRecipes)
5 ripe avocados
1/2 red onion, minced
2 habanero chiles, minced
1 ripe tomato, seeds and pulp removed, chopped
4 Tbsp cilantro leaves, finely chopped
2 Tbsp fresh lime juice
Coarsely ground salt (to taste)
A dash of freshly ground black pepper (to taste)
1. Cut avocados in half. Remove seed. Scoop out of the skin, put in a mixing bowl. Add the lime juice at this stage to prevent oxidation.
2. Using a potato masher, mash the avocado. Add the chopped onion, cilantro, peppers, tomato, salt and pepper, and mix. (Exercise caution when cooking with hot peppers; wash your hands thoroughly after handling.)
3. Cover with plastic wrap pressed directly onto the surface of the guacamole to further prevent oxidation. Refrigerate until ready.
MANGO SALSA (adjustments made)

(photo from SimplyRecipes)
2 ripe mangos, peeled, pitted, and diced
1/2 medium red onion, finely chopped
1 habanero chile, minced
1 small cucumber, peeled and diced (NOTE: scrape out the seeds with a spoon if desired)
3 Tbsp fresh cilantro leaves, chopped
3 Tbsp fresh lime juice
Salt and pepper to taste
Combine all of the ingredients in a bowl and season to taste.
- M
I have no expectations regarding this blog ... other than expecting it to go pretty poorly. I mean, really - who blogs? Why would anyone want to read about my relatively mundane adventures in the kitchen? I have no answer to that question; however, I miss writing. I miss "creating."
Since leaving academia, my artistic outlets have all but disappeared. Up through high school, I rode horses, played cello, and sang. In college, I sang (way, WAY too much) and even made a brief foray into tap dancing. Now that I'm 25, working 9-to-5, and nesting out of wedlock, I've found my expressive outlets to be relatively limited.
One of the ways in which I've channeled this excess energy ("energy" being a relative term) is through fashion. I find great pleasure in pairing colors, shapes, and textures ... and digging myself into even greater credit card debt. I receive InStyle and Lucky Magazine, and am - like an idiot - a subscriber to various online sale outlets (e.g. Shop It To Me).
The other creative activity I've adopted is cooking. I've always loved eating ("She's a binger - but don't worry, she doesn't purge," said my Mom to my college roommate's aghast mother), but it wasn't until I moved into my own apartment that I really started exploring the art of cooking. I subscribed to Real Simple and Cooking Light and signed up for Boston Organics, a bi-weekly local organic fruit and vegetable delivery service. This in and of itself has had a major influence on my culinary inclinations. Would I have ever bought collard greens or swiss chard at the grocery store? No. Do I now know a half a dozen ways to prepare each? Yes.
Don't get me wrong - I have my limitations: Is the list of ingredients more than a dozen items long? Not happening. Is the prep time in excess of 1 hour? Not so much. Does the recipe even remotely resemble an episode of Good Eats? Oh HELL no. I keep it simple and I keep it honest, but I also try my best to keep it interesting. I could eat pasta or Chinese food takeout every single night of the week, but who knows how long I'd last before dying of scurvy, boredom, or morbid obesity.
My cooking so far has been met with mostly positive results. My boyfriend Matt is a willing - albeit disgruntled - guinea pig; he's convinced it's my life's mission to make him fat. My extended family has been pretty impressed by my contributions to holiday meals; however, you could put almost anything on a table in a room full of Jews and you bet your ever-expanding ass it'll be gone in under 30 minutes.
And so, here I am. Your everyday girl trying to find the pleasure and fun in everyday life. Bear with me, folks; I promise it's nothing you haven't read before.
- M

